Author: jeremy

  • My favourite ice cream maker for gelato, sorbet and smoothies

    My favourite ice cream maker for gelato, sorbet and smoothies

    Summers in Australia are hot hot hot and it’s a dry heat. Sorbet, ice cream and gelato are faves during the sweltering months and it’s easy with an ice cream maker. Especially in February after heading back to work and trying to fit in the beach time and summer activities. For the people in the northern hemisphere, it’s a different time of year but we all love a good gelato. 

    My fave is the Ninja CREAMi Ice cream maker, check it out. It has other functions like for frozen yoghurt and milkshakes. I use the smoothie option, yummy. A good combo here is matcha powder, some plain ice cream and a little cream – omg. 

    One of my fave recipes is coconut milk and honey. I put 5 egg yolks in it and a little cream to richer it up. 
    In summer I sometimes throw in mango too. This machine is so strong I just chuck in all of the fruit and ingredients, freeze it (or not) and mix it up. For a smooth gelato texture, freeze and mix a few times to get the icicles out. 
    Are you making your own gelato? Share your fave recipe in the comments. 

    Follow me on these platforms for more: threads, Insta, Facebook, TikTok, Pinterest

  • How to make seaweed tea or fertiliser for the garden

    How to make seaweed tea or fertiliser for the garden

    Seaweed tea is an amazing fertiliser for your garden and has benefits also as a foliar spray, fertilising and protecting. The materials you need are readily available if you’re near the ocean and it’s quick to prepare. 

    If you’d like to research the benefits yourself, check some of the seaweed fertiliser products on amazon or jump on Google and search. 

    Gather your seaweed

    Grab a bucket and hit the beach. The kelp type of seaweed works well but you can use anything. Throw it in the bucket after you’ve removed any sea creatures. 

    Rinse your seaweed

    Rinse off the seaweed with fresh water. You don’t have to, but the salt can be too much for some plants. 

    Leave it in the water

    Put your washed seaweed back into the bucket and fill it with fresh water. Place the lid back on but leave a small gap. Aerobic steeping works faster. Adding an air pump also speeds it up, but that’s not necessary. 

    Mix your seaweed tea fertiliser

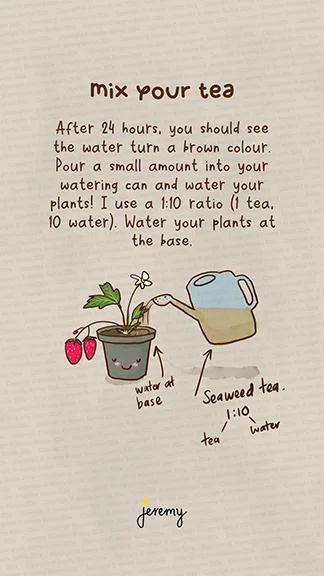
    Your water will start to discolour pretty much immediately, but after 24 hours it’s steeped enough that you can extract some and use it on the garden. 

    Put a small amount into a watering can and mix it to a ratio of 1 part tea to 9 of water (yes, my diagram below is wrong!). Try watering around the plants just a little to begin with. 

    Repeat the process

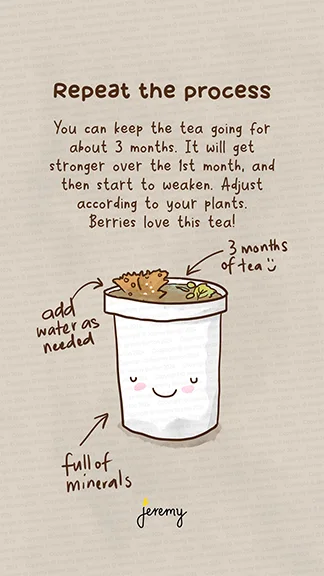
    You can keep the process going for ages. It will get stronger and stronger, so dilute it further as it ages. Test it out on your plants and see how they respond. I’ve found that berries love it!

    Follow me on these platforms for more: threads, Insta, Facebook, TikTok, Pinterest

  • My favourite coffee – Vittoria coffee beans, latte

    My favourite coffee – Vittoria coffee beans, latte

    You might be the same with coffee, you try a heap of different flavours and brands to find the one you like. Eventually you get it down to a short list and then eventually, down to two or even find THE ONE! 

    That brand or flavour that you just keep coming back to, you might keep trying a few different ones that you thought might be good. But then there’s this one that you rely on. For me and coffee beans, that’s this brand – Vittoria Coffee Beans, Latte. 

    I don’t buy latte’s at cafes, but this brand of coffee beans suits me fine. Love the flavour and cream it produces in the machine. If you haven’t tried this flavour, give it a go. 

    A good coffee is a memory maker. Let me know if the comments if you try these out. 

    Follow me on these platforms for more: threads, Insta, Facebook, TikTok, Pinterest

  • How to make cold brew with coffee grounds

    How to make cold brew with coffee grounds

    You can make your own cold brew coffee by grinding your own coffee grounds, mixing wth water and letting it steep for a while. It’s not too hard, let’s get started. 

    Grind your beans and mix your cold brew

    You’re going to need your old coffee grounds or coffee beans, a grinder, water and something to steep your brew in. You can use anything. Something glass is ideal or use a coffee pot with a filter, like a Hario Mizudashi. 

    Grind your beans (or use the old grounds from your coffee efforts!) in whatever way suits you and add the grounds and water into your steeping pot. It’s easier to put the grounds in first and then the water. I use a ratio of 50 grams / 1.8 oz of coffee grounds to 600ml / 20 oz of water. 

    Steep your brew

    Place the lid on your pot and steep it in the fridge for half or a full day. Test out the strength that suits you by taking it out at 12 hrs and tasting it. The longer the stronger, until at a certain point and then it becomes bitter. 

    Make coffee concentrate ice cubes

    I’ve experimented with all sorts to improve the concentration and coffee ice cubes work well. Premake some espresso shots and pour them into a silicone ice cube mould that pops out easily. Freeze! This way your cold brew doesn’t get diluted, it get’s more concentrated. 

    Enjoy your cold brew

    I pour two thirds of a cup of cold brew and then use concentrated cream (learnt that trick in Japan) or milk if it suits you better to top it up. Throw in your concentrated coffee ice cubes too and enjoy with someone special. 

    Leave a comment if this helped your cold brew making.

  • How to grow mulberry trees from cuttings with wax

    How to grow mulberry trees from cuttings with wax

    Mulberries are awesome trees because they have so many uses and are real easy to propagate. The cuttings will root if you leave them lying on the ground and they have enough water. 

    Here’s a few tips on how to grow your own mulberry trees from a cutting using wax. 

    Grab a mulberry cutting

    Get yourself a cutting off a healthy tree. You might able to find a tree in a public space in your neighbourhood, a neighbour may have one or you could order online. 

    A cutting that’s thicker than a pencil, 30-40 cm or 16 inches or longer is good. The thicker and longer, the better chance of survival. Anything thinner than a pencil may not survive and may need lots of attention. 

    Prepare your cutting

    Keep your cutting(s) in the shade. Close off the open parts where you cut (not the base) with some wax. I use baybybel cheese wax because we eat the cheese! Put the wax in a jar lid and melt it with a candle or other method. You can just use candle wax too. 

    This closes off the open wounds on the cutting so that water doesn’t evaporate the and cutting dries out. 

    Plant your cutting

    Plant your mulberry cutting in a 10L or 2.5 gal pot. Water it in and mulch it. Any neutral soil that’s a little sandy and has lots of organic matter will suit.

    Place your potted cutting in a shady spot to settle and root. 

    Leaves will shoot

    Wait for a month or so and your first leaves will start to shoot from the cuttings. The cuttings won’t be rooting yet, so keep watering and be patient. I water every couple of days or daily in summer. Keep your pot in the shade. 

    You got mulberries!

    A few months later your cuttings will be small trees, rooted and producing small berries. The first berries will be small and not really the yummo. Plant your tree in the ground in a place where it has access to water and sun and it will thrive. 

    These trees (unless it’s a drwarf version) will grow up to 5m / 16 ft so give them some space. You can trim them aggressively and make more cuttings. 

    Enjoy your berries!

    Follow me on these platforms for more: threads, Insta, Facebook, TikTok